
In this lesson, we will learn how to create colorful pictures from black and white astronomical images.
Background
Every picture of space starts out as a black and white scientific image. Raw scientific images from a telescope contain a lot of information about the astronomical object that was observed. Scientists use a process to color the pictures called false color imaging to essentially color-code the information they want to look at, as well as make the more pleasing to the eye.
Astronomical images are often made up of multiple images taken in different filters. Filters are used with telescopes and only let certain wavelengths of light to reach the camera on the telescope. They also allow us to see light that may not be visible to the naked eye and to see only certain parts of the visible light. For example, one filter could show visible light, another shows ultraviolet light, and a third shows infrared light. Since we can’t see light from the ultraviolet and infrared ends of the spectrum, we instead assign them to colors that we can see so that we can Astronomers want to see different types of light because we can learn more about a star or other astronomical object when we observe it at different wavelengths. Some objects or parts of objects can not be seen in visible light, so we need to use other wavelengths to study them.
Most telescopes use BVRI filters. Each filter is titled with a letter that roughly corresponds to the wavelengths of light it lets pass through. The B filter works with the blue end of the visible spectrum, V goes with the mid-range visible spectrum, R corresponds to the red end of the visible spectrum, and I lets us see infrared light. When astronomers create a false color image, they combine multiple pictures taken with different filters. Each picture is first assigned to a color that may or may not correspond to the filter it was taken with. An image taken with the B filter may be assigned to the color blue, but an image in the I filter will need to be given a color on the visible spectrum. This HubbleSite example (image shown below) uses the Bubble Nebula to show how each image starts out black and white until it is assigned a color:
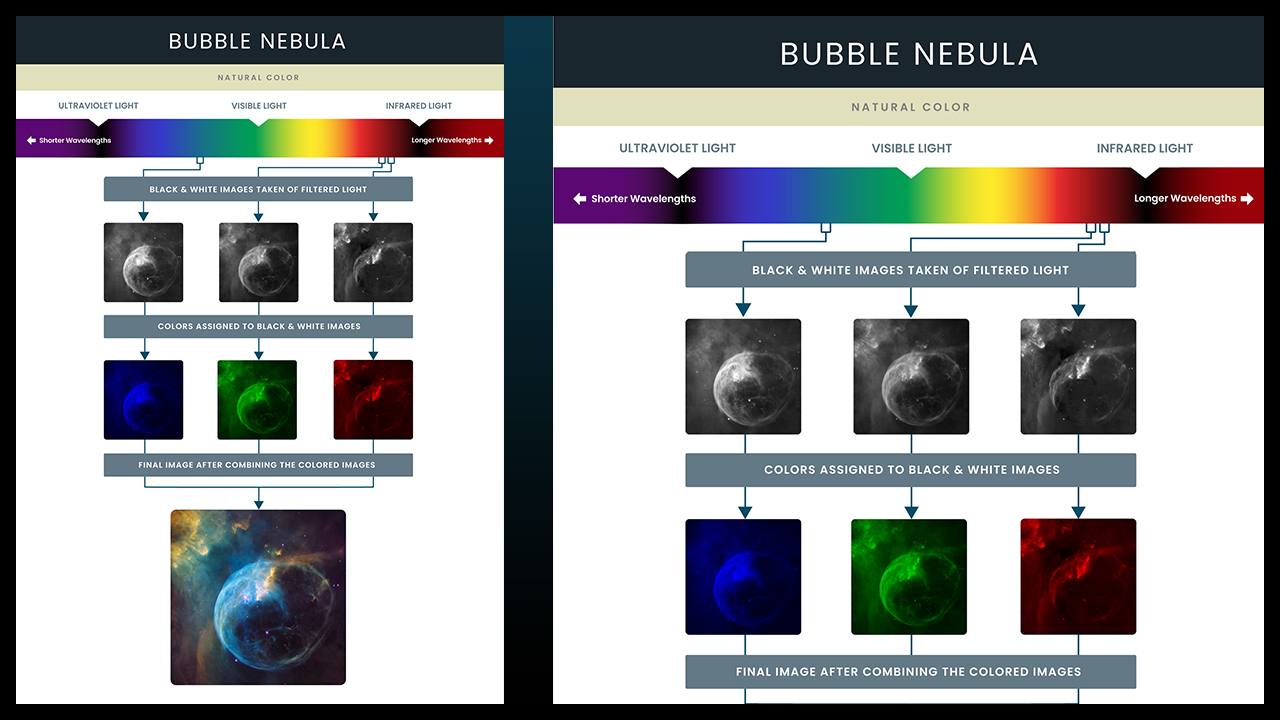
As you can see in the example, the color given to each image does not necessarily need to match the filter it was taken with. The image on the left was taken in wavelengths that correspond to green visible light, but it was colored blue. Similarly, the image in the middle was taken on the red end of the visible spectrum, but was colored green. Generally, when combining three images, the picture taken of the shortest wavelengths is colored blue, the picture of the longest wavelengths is given the color red, and the picture in the middle is colored green. After each image has been assigned a visible color, they are then combined to make one colorful image. To get an idea of how this works, take a look at this HubbleSite example where you can see each image individually as well as the final combination of images.
Creating a False Color Image
We will be using a free image processing software called JS9 to create a color image of M31, also called the Andromeda Galaxy. JS9 is available to use in your browser and should not require any downloads.
First, you will need to download the images of M31. They are available through the European Space Agency’s Hubble website. For this lesson, you will need the first three images. Click on the bold link at the beginning of each line to download the images. They are titled f001a066.zip, f001a1hr.zip, and f001a25o.zip. Notice that the filter of each image is included in the information after the link to download it. Be sure to save the images somewhere you can easily find them later. The images are compressed into zip files. Astronomical images use a file type called FIT or FITS files that contains a lot of information about the image and the object observed as well as the image itself. Compressing them makes downloading and sending the images faster, but you will have to unzip the file to use it. On some computers, unzipping the files may be as easy as double clicking on the file. Depending on your computer, you may need to download a free program to access the usable image. Some popular free unzipping programs include 7-Zip for Windows and The Unarchiver for Mac. Once you have your images unzipped, you may wish to rename them to something more helpful. For example, I renamed my images to f001m31B, f001m31I, and f001m31I so that I would know what the images are of and what filter they use.
Next, go the JS9 website: https://js9.si.edu. JS9 is an astronomical image program that can work directly from the browser, so you don’t need to worry about downloading and installing the program on your computer. We have embedded JS9 onto this page for your convenience.
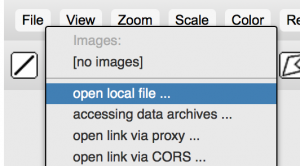
To open your images of M31, click File again, and click Open Local File… in the drop down menu.
Navigate to the folder where you saved your images of M31 and click on one of your .fits files to open it in JS9. Repeat this two more times to open all three of your images. When you open a second image, it will replace the first image in the JS9 window. Do not worry about this. Your first image is still open, it’s just in the background. To navigate between images when you have multiple open, click File. At the top of the drop down menu is a list of the images you currently have open. The current active image will have a symbol next to its name that looks like a blue circle with a Sun inside it. Click on another image name to switch to that image.
When you open your images of M31, they may appear to be mostly white with some gray around the edges. This is because the images are larger than the window displaying them. You can zoom out on the images by clicking the icon of a magnifying glass with a minus sign in it on the toolbar above the image. It may also help to resize the JS9 viewing window by clicking and dragging on the two diagonal lines near the bottom right corner of the image.
Switch between the three images and take a look at them. Do they all look the same? Images taken in different filters will look different even when they are all taken at the same time of the same object. This is because some parts of the object will have more light of a certain wavelength than other parts. The I filter image of M31 is the brightest at the center of the galaxy, telling us that the center of M31 has more infrared light than the outer parts of the galaxy.
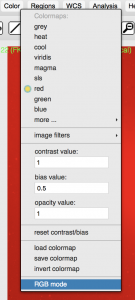
To start coloring your image, you will need to assign a color to the three images before combining them. Open the B filter image by clicking on File and then the name of the image. Color the image by clicking on Color and then Blue in the drop down menu.

Assign colors to the I and R filters the same way. Since the I filter corresponds to the longest wavelengths in this case, we will color it red. Similarly, we will color the R filter green because it falls into the midrange of wavelengths in this case.
Finally, combine the images by clicking on Color and, at the bottom of the drop down menu, click RGB Mode. This will merge your three colored images into one image with many colors made up of combinations of red, green, and blue.
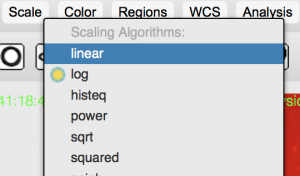
Your image will probably look washed out and white overall. To change this and get more variety in your image, you can change how colors are displayed in each of your three filter images. Click the Color menu and RGB Mode again to turn it off. This will let you see how the color changes in each image before combining them again. Next to the Color menu is Scale. This does not refer to the size and scale of the pictures, but the scale of the colors. There are many different scales used to display colors in astronomical images and they can look drastically different. Click on the Scale menu and click the first option, Linear.
Switch to the next image and change it to a linear scale, and then do the same on your third image. Recombine your images using RGB Mode to see how the resulting image has changed.
Now that you know how to change the color and scaling of the filter images, have some fun and play around with them to see what other interesting images you can create of M31! Feel free to change the colors assigned to your original images as well. The method of assigning blue to the highest wavelength image, green to the middle wavelengths, and red to the lowest wavelength image is one of the generally accepted ways of coloring astronomical images. This certainly doesn’t mean you can’t do things differently, so change it up if you want!