
Introduction
To request access to the GORT telescope, users must submit a short observing proposal for approval. We have prepared a GORT Proposal Guidelines document to help you structure your submission.
Download the GORT Proposal Guidelines (PDF)
For information on the types of objects that one could observe using GORT, see Specific Objects.
The chapters that follow describe how to properly make astronomical observations using GORT’s Observatory:
-
AAVSO’s variable star plotter – Plots a map of the stars in user specified regions of the sky.
Exposure Time – Provides a calculator to determine the best exposure time and filters to observe the specific object you have chosen.
Scheduled Observing – Includes steps for scheduling observation requests using GORT. The scheduler will determine the best time for your observations and will complete them automatically.
Live Observing – Includes steps for observing objects in real time using GORT.
Schedule Browser – Allows you to track the status of your observation requests.
Archived Images – Guides you through locating and downloading your images for analysis.
-
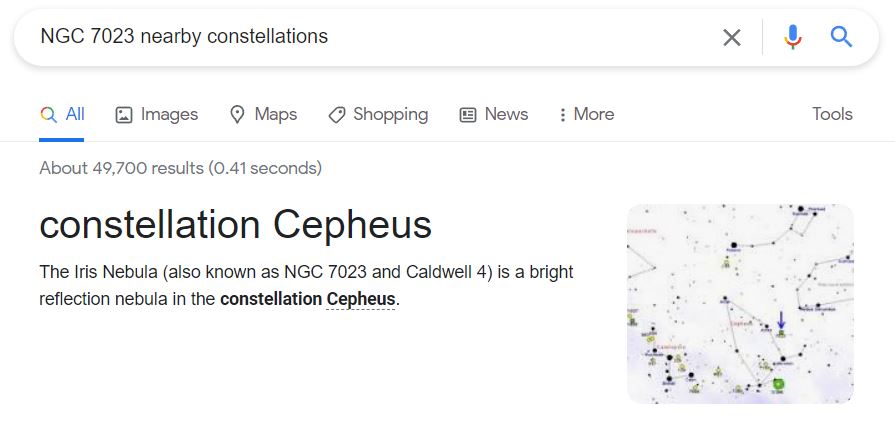
Designation – If you are observing an exoplanet transit, you’ll enter the name or designation of the star your exoplanet is orbiting. If you are observing a nebula, you can locate a nearby star via a simple google search for the nebula’s nearby constellations. You can then search for this constellation using Stellarium and write down the star closest to your nebula. For example:
- Field Of View – Write down the FOV that allows you to nicely see both your object and the star in the same viewing window.
Requesting an AAVSO Star Plotter Chart
You may want to download a star chart prior to scheduling a request using GORT. Much like GPS maps help us navigate the real world, comparing the stars in this chart to the ones in your image will help you locate your object of interest. To submit your request, you’ll need the following information handy:
Now that you have these necessary details available, click on the “AAVSO’s Web Form” tab above for help submitting your request.
How To Fill Out AAVSO’s Web Form
You are ready to begin filling out your star chart request form! Visit the AAVSO Variable star plotter web page. The following steps will guide you through the process as you fill out the web form:
-
Enter the star name into the first text field.
Under “CHOOSE A PREDEFINED CHART SCALE”, select a field of view equal to or greater than the one you wrote down. Your goal should be to eventually scale down to “F (18.5arcmin)” from the dropdown menu.
Make sure CCD and chart are selected.

Scroll down to Advanced Options.
-
For “Should Other Variable Stars Should Be Marked?” select “Yes (all in VSX)”.

Click Plot Chart and wait for your results to load.
If you receive a name/designation error message after submitting your request, try using an alternative astronomical catalogue name for your star. If you’ve exhausted the star’s catalogue names and are still receiving error messages, then you’ll need to search for a different star.
Once you’ve successfully generated a star chart…
-
Locate your star on the chart in comparison to Stellarium’s sky map. (If you find yourself struggling to compare the star chart to Stellarium’s sky map or to your GORT images later on, consider adjusting the North and East Orientation on the star plotter form.)
If you are planning on observing an object other than the one centered in the star chart, you may also need to focus in on your object by reducing the chart’s scale a few times. If your chart’s scale is greater than 18.5arcmin and there is a labeled star that is closer to your object, try plotting another chart around that star instead while narrowing the chart’s scale appropriately.
Once you’ve successfully generated a chart with an ideal field of view and matched it with nearby stars on Stellarium, click “Plot Another Chart” and enter 14 for the “Magnitude Limit” this time so that the stars shown on the chart are comparable to the ones visible in GORT’s images.
Save your chart under a descriptive name to be used later once your images have been added to the GORT archive.
You are now ready to use the GORT Observatory Web Page! Continue to the “Exposure Time” chapter on the left.
Exposure Time
There are multiple methods for calibrating images. For our purposes, we’ll be using the following:
-
Exposure Time Chart – For images taken of nebulae, it is recommended that you use our calculator provided above.
Field Images – For transit observations, we recommend taking field images. Step through the tabs above labeled “Taking Field Images” and “Viewing Field Images” for a step-by-step process of applying this calibration technique.
Exposure Time Chart Coming Soon!
How to take field images
On the GORT Observatory website, click on ‘single series’ under the ‘Scheduled’ box. You will be directed to fill out the Schedule Image Series web form as follows:
Scheduler Project:
-
Begin a new project to organize these field images under. Type the name of your project in the ’New Project’ line. Leave the ‘Select Project’ dropdown menu blank.
Object and Coordinates:
-
Enter your target name in the ‘Target Name’ box. (For simplicity, this should simply be the name of your star for your field images.)
Then enter the RA and DEC you recorded for your target. Do not rely on the Deep Sky Catalog Search option to automatically update your object coordinates as these may not be correct for GORT’s viewing location.
Images and Processing:
Here you should enter around 12 images, with each row representing a single image. For each image:
-
Decide how many filters you want to use. Select Use for each filter for which you desire images. Set count equal to 1.
Select the Filter name (B, V, R, I, or Clear). It is recommended that you include multiple (around 3) filters to collect your field images. See Analysis for a deeper understanding of what each of these filters do.
Enter a range of durations, or exposure time in seconds, for each filter. This allows you to compare light counts of different exposure times for multiple filters, in case one or two do not provide good counts for the exposure times you chose to test. For example, if you use the V filter, you should choose 30, 60, 90, and 120 seconds, as it tends to get lower light counts. For the Clear filter, you should choose something like 10, 30, 45, 60, as it tends to have high counts. And if you use the R filter, you should choose durations somewhere in between these two. Do not pick random numbers as exposure time (e.g. 24, 47, etc), as it will be extremely unlikely to find a matching dark image with that exposure time. Values such as 10, 20, 30, 45, 60, 90, 120, 200, etc. will have matching darks.
Keep binning at 1.
Next, is the dithering option. The default should be -1.0, which corresponds to ‘auto’, but if it is anything else, enter -1.0 in the box. (This will shift the telescope by a few pixels prior to each image observation to minimize the possible effects of hot pixels or dead pixels in stellar images.)
Keep autofocus checked to require that focus will be determined for each observation set. Leave Auto Calibrate box unchecked.
Constraints:
You can leave the Constraints section as is. It should have the following parameters preset:
-
Horizon should be set to 35 and ‘Sky Condition’ should be set to ‘Good’, although this should also not really affect your observation. Everything else should be blank/unchecked.
Priority and Series:
-
Specify a Priority for this observation set. Your priorities can run from 1 to 10 for different observation sets or projects. (Higher numbers reflect higher priorities.) If necessary, the Scheduler will consult your priorities when scheduling potentially conflicting observations. Priorities are automatically normalized among different observers.
Set ‘Repeat Series’ to 1, so it only takes 1 of these images. If you would like to have multiple runs of these field images, you can change this number (make sure the time stays within your allotted telescope time).
Timing and Monitor Mode:
-
For field images, keep everything blank, unless you absolutely need the images taken by a certain time.
Enable and Submit Request:
-
After entering all parameters for your observations, if you are ready to submit your request to the Scheduler, you should click the “Enable Requests Immediately” check box. You must then click Submit Request.
How to look at Field images
Open up AIJ, or another astro-imaging application.
- If you are using AIJ, click on file, import image sequence, and open the folder of your field images.
- Look at the images and confirm your star(s) by using a finder chart.
- Look at the light counts of the stars in each image. Ideally, you want your star(s) to have light counts between 20-40 thousand, but there is a little flexibility here. GORT’s images get saturated at 65k counts, so you want to make sure you are not close to this number and accidentally saturate your images. Furthermore, if your light counts are too low, the fluctuations will be too large relative to the actual transit flux dip.
- Once you find your image with good light counts, record the filter and exposure time (will be in the image file name, or you can check the FITS headers).
- Once you decide on the filter and exposure time which resulted in good light count values, you can now make the actual transit observation request.
Continue to the “Scheduled Observing” chapter to the left to create a transit request.
Scheduled Observing Mode
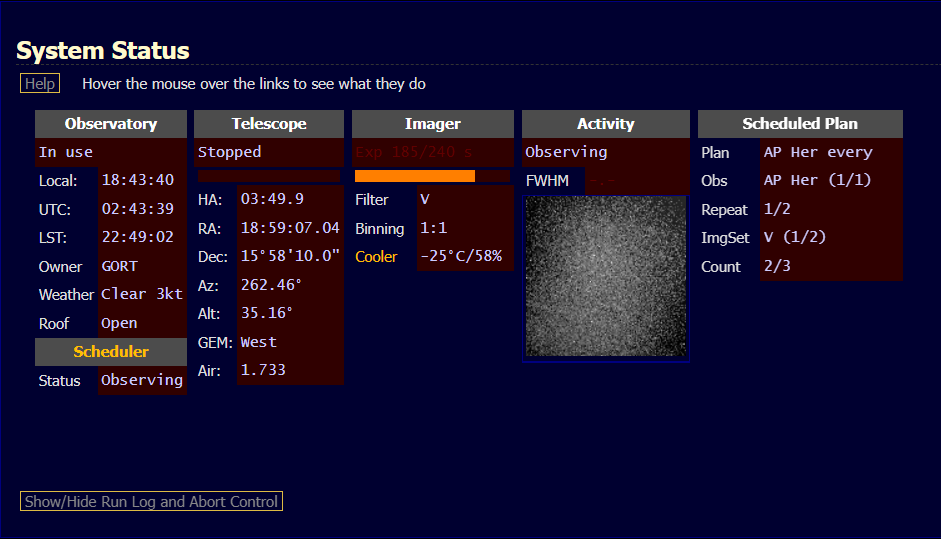
Requests for scheduled observations may be generated using the Scheduled section on the top of the pop-up sidebar on the left side of the screen on the GORT Observatory web page. The Scheduler will evaluate your request and determine the most optimum time to schedule your observations. Prior to using this feature, you should also evaluate the times and days when weather conditions are favorable to ensure that GORT will be able to complete your request. The Clear Sky Chart below displays the viewing conditions at GORT currently and predicted for the next three days. If you need help analyzing the chart, the Observatory Clear Sky Chart website provides an explanation of what each row means.
To submit a scheduled observation request, open the Scheduled section of the drop-down menu. The sections above will help you navigate this web form according to your specific goals:
-
For simple imaging applications, select Single Series. This will open the Schedule Image Series web form. This selection is appropriate for observing nebulae and other small multi-filter scientific observation sets.
Transit Requests will also utilize the Single Series web form, however a specific procedure should be followed for observing exoplanet transits.
Single Series
It is recommended that you take field images so you know what filter and exposure count, as well as confirm your target has a good field of companion stars nearby, within GORT’s field of vision. Now that you have your target, and know what filter and exposure time to use, you can now submit an observation request for GORT. On the GORT Observatory website, click on ‘single series’ under the ‘Scheduled’ dropdown tab. The observation request form has the following sections:
Scheduler Project:
Scheduled observations are organized in observing projects. Each project can consist of one or more observing plans.
- If you wish to modify parameters for an existing project, select the name of the project using the drop down menu. Make sure there is nothing in the ‘New Project’ line.
- If this is a new request, enter a name for a new project.
Object and Coordinates:
- Enter a target name for the object you will be observing. This name will be used as part of the file name for the images that are obtained and stored in the GORT Image Archive. Non-stellar objects may be specified by using the standard catalog designation for these objects (For example, M 42 or NGC 2113).
- Enter the RA and DEC you recorded for your target. Do not rely on the Deep Sky Catalog Search option to automatically update your object coordinates as these may not be correct for GORT’s viewing location. Coordinates must be J2000 coordinates.
Images and Processing:
- Click the Use check box for each filter requested. (There a separate line for each filter requested.)
- Enter Count for the number of images for each filter in an observation set. (A count of 2 or 3 is recommended for science images.)
- Select the Filter name (B, V, R, I, or Clear). See Analysis for a deeper understanding of what each of these filters do.
- Enter the Duration. This is the exposure time in seconds.
- Leave the Binning set at 1.
- For Dithering, enter -1.0 for automatic dithering. (This will shift the telescope by a few pixels prior to each image observation to minimize the possible effects of hot pixels or dead pixels in stellar images.)
- Click the Auto Focus check box to require that focus will be determined for each observation set.
- Leave Auto Calibrate box unchecked.
Constraints:
- Specify 35 for Horizon. (This constraint requires that observations will be scheduled only when your target is further from the horizon than this limit.)
- For Moon Avoidance specify 30 for distance in degrees, and 7 for days.
- For Sky Condition select Good.
Priority and Series:
- Specify a Priority for this observation set. Your priorities can run from 1 to 10 for different observation sets or projects. (Higher numbers reflect higher priorities.) If necessary, the Scheduler will consult your priorities when scheduling potentially conflicting observations. Priorities are automatically normalized among different observers.
- Specify the Repeat Series number. (This is the number of times to repeat the complete observation set in a given night.)
Timing and Monitor Mode:
Observations will be made only if they are possible and fall within the specified constraints and priorities. For a simple observation set, no parameters in this section will need to be set. However…
- A parameter in this section (Monitor Interval) can control how often an observation set can be considered on multiple nights. An observation set can be considered every night (Monitor Interval 1), every second night (Monitor Interval 2), every third night, etc.
- A check box (Fixed Time) can also be set to require an observation to be made at a fixed time and date. This will over-ride the attempts by the Scheduler to optimize your observation requests. (If you use this option, it better be really important!)
- Another check box (Run Now) can request that an observation be made immediately, at the current time. If necessary, this request will terminate any Observation Sets and any Plans that are active. (If you use this option, it better be really important!)
Enable and Submit Request:
- After entering all parameters for your observations, if you are ready to submit your request to the Scheduler, you should click the Enable requests immediately check box.
- You must then click Submit Request.
If you are successful, a window will be displayed advising you that your request was submitted successfully. This places your request in a list to be considered by the Scheduler. After you successfully submit your request you may quit the GORT Observatory web site.
See the “Archived Images” chapter on the left-hand side for guidance on how to locate your images.
Coming Soon!
How To Create A Transit Request
Now that you have your target, and know what filter and exposure time to use, you can now submit an observation request for GORT. On the GORT Observatory website, click on ‘single series’ under the ‘Scheduled’ dropdown tab. The observation request form has the following sections:
Scheduler Project:
Scheduled observations are organized in observing projects. Each project can consist of one or more observing plans.
- Select your project from the dropdown menu (assuming you have already created a project when you took field images).
- Make sure there is nothing in the ‘New Project’ line.
Object and Coordinates:
- For ‘Target Name’ it is recommended you put the planet name, as you are observing the planet transit, and that way it will be labeled differently than your field images of just the star.
- Enter the correct RA and DEC you recorded for your target. Again, do not rely on the Deep Sky Catalog Search option to automatically update your object coordinates as these may not be correct for GORT’s viewing location. Coordinates must be J2000 coordinates.
Images and Processing:
- You will just need one line, so make sure only one row’s Use check box is checked/selected.
- Pick the filter and exposure time you discovered yielded good light counts.
- Leave the Binning set at 1.
- For ‘counts’ you will have to decide how long you want each imaging session. This will be subjective, and you may figure out over time what you like. Between each image set it will redo its pointing and hopefully recenter your target star. A good starting point is make your count number * exposure time equal to one hour (in seconds, since exposure time is in seconds). This way each hour GORT will reconnect a pointing update.
- Keep ‘Dither’ set at -1.0 to auto dither.
- Make sure ‘Auto Focus’ is checked and ‘auto calibrate’ is unchecked.
Constraints:
For the ‘Constraints’ tab, keep everything the same as it was before (outlined in the field images description).
Priority and Series:
We will skip this and do this last, after ‘timing and monitor mode’.
Timing and Monitor Mode:
- In the ‘must run after’ box, put in the date and time (remember this is in UTC) of when you want to start the observation. Make sure you start it an hour, or an hour and a half before the actual transit.
- Click ‘fixed time’ so that the observation will start at an exact time you specify, as to get the entire transit as well as time before and after.
- Next go back to the ‘Priority and Series’ section.
Priority and Series:
- Put priority at ‘5’.
- For ‘Repeat Series’, you will want to look at when you chose to start the observation, as well as what you put above for ‘count’ and ‘duration’ in the ‘images and processing’ section. Consider the length of each image set (remember this is count * duration), and when you want to start and end the observation. What you put in ‘Repeat Series’ will repeat the image set the number of specified times, so Repeat Series number * Count * Duration is the total number of seconds of the observation, starting at the time you specified. Make this as long as necessary to capture the entire transit, as well as time before and after.
Enable and Submit Request:
- After entering all parameters for your observations, if you are ready to submit your request to the Scheduler, you should click the Enable requests immediately check box.
- You must then click Submit Request.
If you are successful, a window will be displayed advising you that your request was submitted successfully. This places your request in a list to be considered by the Scheduler. After you successfully submit your request you may quit the GORT Observatory web site.
See the “Archived Images” chapter on the left-hand side for guidance on how to locate your images.
Live Observing Mode
This section of the GORT observatory web page is only accessible after dark and when weather conditions are favorable. Utilize the Clear Sky Chart below to assess current viewing conditions at GORT and determine whether or not a live observation can be completed. If you need help analyzing the chart, the Observatory Clear Sky Chart website provides an explanation of what each row means.
During Live Observing Mode, when you request an image GORT will immediately attempt to obtain the image. This means that you, the observer, need to be certain that your target is observable when you make the request. To make a live request (immediate request) locate the Live Observing section of the pop-up side bar on the left of the screen on the GORT Observatory web page. Open the Live Observing drop-down menu. Two options are available: Single Image and Color Series.
Single Image
This selection will immediately obtain a single image. Click on Single Image. Scroll down to the bottom of the section.
-
Type object name into “Target Name”
Type Right Ascension of object into “Right Asc. (hrs):”
Type Declination of object into “Declination (deg):”
Type exposure time in “Duration (sec)”
Select filter in “Filter” (options: B, V, R, I, Clear)
Select binning (default is 1)
Select Auto focus before imaging
Then click Acquire Image.
If all goes well and your target is currently observable, GORT will immediately attempt to obtain the image as soon as the observatory is not obtaining other observations.
See the “Archived Images” chapter on the left-hand side for guidance on how to locate your images.
Single Object Color Series
This section allows for multiple images using multiple filters for the same target. Click Color Series under Single Object Imaging. Scroll down to the bottom of the section.
-
Type object name into “Target Name”
Type Right Ascension of object into “Right Asc. (hrs):”
Type Declination of object into “Declination (deg):”
Decide how many filters you want to use. Select Use for each filter for which you desire images.
Type the number of images you want for each filter into “Count”
Select the filter in “Filter”
Type exposure time in “Duration”
Leave binning set to 1
Select Auto focus at start
Then click Acquire Image.
If all goes well and your target is currently observable, GORT will immediately attempt to obtain the image as soon as the observatory is not obtaining other observations.
See the “Archived Images” chapter on the left-hand side for guidance on how to locate your images.
Schedule Browser
Note that while the scheduled and live observing modes provide a convenient means to quickly create observing requests, it is also possible to use the Schedule Browser directly to create and edit observing requests. Beginning users should definitely use the observing web forms before attempting to use the Schedule Browser directly.
Once images have been taken using any of these methods, you can also check on the status of your request using the schedule browser. To access the schedule browser from the GORT Observatory web page, click on ‘Schedule Browser’ under the ‘Scheduled’ tab. This will bring you to the schedule page, which shows all of GORT’s currently active jobs.
The columns are somewhat self explanatory. ‘Project’ is simply the name of the project and ‘Observer’ the name of the observer who submitted the request. ‘PLNS’’ is the number of submitted observations/plans within the job, ‘IMGS’ is the total number of images requested within the project, and ‘TIME’ is the total amount of time requested within the project.
The next columns each correspond to the results of the submitted requests within each project. ‘RUN’ tells you what percentage of the project is currently being run by GORT. If you have only one submitted request, and GORT is taking those images, this will say ‘100%’. ‘CMPL’ tells you what percentage of the project has been successfully imaged. ‘PEND’ stands for pending. This is the percentage of jobs that have been submitted to GORT, but have not been attempted yet. This is usually where your jobs will go between submitted request and actual observation. ‘DEFD’ stands for deferred. A plan is deferred for a variety of reasons, the most common being a horizon constraint (the object is too low to observe so the scheduler defers it to a later time when it is higher). Next is the ‘Fail’ column which is self-explanatory. GORT will fail jobs that it does not like. This is most likely due to human errors such as an unobservable target, an invalid observation time, or a run canceled by an operator. The last column, ‘DIS’, is the percentage of jobs designated as disabled. Similar to the failed jobs, these will not run unless something is adjusted and resubmitted. This is most likely due to a designated observation time being already passed.
On the left hand side of this page, you will see a few options at the top, followed by a list of your projects. ‘Project Information Page’ is where you are looking, and ‘Observatory Control’ takes you back to the gort.my-sky page. ‘Scheduler Engine Log’ is useful if you want to see the log for GORT’s last attempted observation. You can also look at individual logs on the gort.my-sky page, which is likely more useful. Ignore ‘Special Forms’ for now. The next three options are self-explanatory: you can pause or resume all of your projects (best to be kept alone and pause projects one at a time), or create a new one. The ‘Create New Project’ is simply another interface to submit requests. After these options is a list of all of your projects. If there is a green play logo next to them, they are active, and plans/requests under them will be attempted.
If you click the small plus sign next to a project, it will list out all of the plans (requests) made within that project, with a little logo next to them which correspond to its status: happy face meant it is pending, thumbs up means completed, thumbs down means failed, and red circle means disabled. You can then click on the little plus sign next to each plan to see the list of image requests within each plan. These will have the same icon system.
You can click on any project line, plan line, or image request line to see more information. Furthermore, you can edit a parameter, then hit ‘save’, and ‘resubmit’ to change a parameter and try again (in the case the plan failed, for example). You can also cancel/delete/disable what you no longer wish to observe. If you incorrectly enter a request, and submit a new one, please delete the old request so the scheduler log is not bogged down by numerous failed/abandoned requests. Perhaps the most useful tool on this page is the ability to see why GORT failed or deferred a job. If you see a job has failed or been deferred: click on the plus sign next to the project, click on the plus sign next to the failed plan, then click on the observation request. At the top it will say something like ‘Status: Failed’ and under that, the reason it resulted in a failed/deferred. This is extremely useful for quickly seeing why a job did not go through, which you can then use to try to fix and resubmit.
Archived Images
Astronomers refer to digital photographs from telescopes as images. To analyze image data, astronomers use a file format called FITS (Flexible Image Transport System). FITS files include information that is useful to the analysis, such as the pointing direction of the telescope and the time the image data were acquired. After downloading GORT or MicroObservatory data, there are several software packages that you can use to analyze the FITS files.
After images are taken, raw GORT data are automatically archived on SSU servers and reduced GORT light curves are archived through the AAVSO (American Association of Variable Star Observers).
To download your images, you can either download them from the GORT Archive, or directly from the GORT Observatory website. From the observatory website:
- Click “My Documents” on the left
- Click “Acquired Images”
- Decide what date you want to download images from
- For that date, select “Explore”
- See image names under “Name” and decide which images you want to download
- Click on the names of the images to download
Congratulations on observing your first object(s) using GORT! Now you’re ready to analyze your images.